quinta-feira, 21 de julho de 2022

Curso Trilha CCNA 200-301

 https://www.youtube.com/watch?v=q-NJJkJUO3E


https://www.dltec.com.br/panel/courses/87/detail


http://www.dltec.com.br/class/mod/resource/view.php?id=4012


https://drive.google.com/drive/folders/1vxh_X3QUTDFOH5rC60qxBDVJTZiFbfxd


https://www.eve-ng.net/index.php/download/


quarta-feira, 6 de julho de 2022

How To Install FreePBX 16 on Debian 11 / Debian 10


FreePBX is a web-based open source GUI (graphical user interface) that controls and manages Asterisk (PBX). This tutorial will help you to Install FreePBX 16 on Debian 11 / Debian 10 Linux system. A pre-requisite for this setup is Asterisk Server that has been installed, configured and confirmed to be running:

You can reference our guides below for how-to process:

Step 1: Install MariaDB Database server

Run the commands below to install

sudo apt update
sudo apt -y install mariadb-server mariadb-client

Step 2: Installing Node.js on Debian

FreePBX has Node.js as a dependency, install it on your system by using the commands below:

sudo apt install nodejs npm

Check the version of Node.js installed:

$ node --version
v12.22.5

Step 3: Install and configure Apache Web Server

Install apache2 package from apt:

sudo apt -y install apache2

Then change Apache user to asterisk and turn on AllowOverride option :

sudo cp /etc/apache2/apache2.conf /etc/apache2/apache2.conf_orig
sudo sed -i 's/^\(User\|Group\).*/\1 asterisk/' /etc/apache2/apache2.conf
sudo sed -i 's/AllowOverride None/AllowOverride All/' /etc/apache2/apache2.conf

Remove default index.html page

sudo rm -f /var/www/html/index.html
sudo unlink  /etc/apache2/sites-enabled/000-default.conf

Step 4: Install PHP and required extensions

Add APT repository configuration dependencies:

sudo apt install -y lsb-release ca-certificates apt-transport-https software-properties-common gnupg2

Add the PHP packages APT repository to your Debian server.

echo "deb https://packages.sury.org/php/ $(lsb_release -sc) main" | sudo tee /etc/apt/sources.list.d/sury-php.list

Import repository key:

wget -qO - https://packages.sury.org/php/apt.gpg | sudo apt-key add -

Remove any current version of PHP installed:

sudo apt remove php*

FreePBX is dependent on PHP, run the following commands to install php and required extensions.

sudo apt install php7.4-{mysql,cli,common,imap,ldap,xml,fpm,curl,mbstring,zip,gd,gettext,xml,json}

Install PHP Apache module:

sudo apt install libapache2-mod-php7.4
Update PHP variables
sudo sed -i 's/\(^upload_max_filesize = \).*/\120M/' /etc/php/7.4/apache2/php.ini
sudo sed -i 's/\(^upload_max_filesize = \).*/\120M/' /etc/php/7.4/cli/php.ini
sed -i 's/\(^memory_limit = \).*/\1256M/' /etc/php/7.4/apache2/php.ini

Step 5: Install FreePBX 16 on Debian 11 / Debian 10

Install the following packages.

sudo apt install sox mpg123 lame ffmpeg sqlite3 git unixodbc dirmngr postfix  odbc-mariadb pkg-config libicu-dev

Configure ODBC:

sudo tee /etc/odbcinst.ini<<EOF
[MySQL]
Description = ODBC for MySQL (MariaDB)
Driver = /usr/lib/x86_64-linux-gnu/odbc/libmaodbc.so
FileUsage = 1
EOF

sudo tee /etc/odbc.ini<<EOF
[MySQL-asteriskcdrdb]
Description = MySQL connection to 'asteriskcdrdb' database
Driver = MySQL
Server = localhost
Database = asteriskcdrdb
Port = 3306
Socket = /var/run/mysqld/mysqld.sock
Option = 3
EOF

Download the latest version of FreePBX 16 on Debian 11 / Debian 10:

sudo apt -y install wget
wget http://mirror.freepbx.org/modules/packages/freepbx/7.4/freepbx-16.0-latest.tgz

Extract the file:

tar xfz freepbx-16.0-latest.tgz
rm -f freepbx-16.0-latest.tgz

Install FreePBX 16 on Debian 11 / Debian 10

cd freepbx
sudo systemctl stop asterisk
sudo ./start_asterisk start
sudo ./install -n

If you have a root password for database server, use:

sudo ./install -n --dbuser root --dbpass password

Replace password with the root database password.

Sample installation output:

Done. All modules installed.
Updating Hooks...Done
Done installing modules
Taking too long? Customize the chown command, See http://wiki.freepbx.org/display/FOP/FreePBX+Chown+Conf
Setting Permissions...
Setting base permissions...Done
Setting specific permissions...
32451 [============================]
Finished setting permissions
Generating default configurations...
Finished generating default configurations
You have successfully installed FreePBX

Install all Freepbx modules

sudo fwconsole ma disablerepo commercial
sudo fwconsole ma installall
sudo fwconsole ma delete firewall
sudo fwconsole reload
sudo fwconsole restart

Enable Apache Rewrite engine and restart apache2.

sudo a2enmod rewrite
sudo systemctl restart apache2

If you have an active ufw firewall, open http & https ports

sudo ufw allow proto tcp from any to any port 80,443

You have successfully installed FreePBX on Debian Linux server.

Create FreePBX systemd (startup script)

Create a systemd unit for auto-starting the service:

sudo tee /etc/systemd/system/freepbx.service<<EOF
[Unit]
Description=FreePBX VoIP Server
After=mariadb.service
[Service]
Type=oneshot
RemainAfterExit=yes
ExecStart=/usr/sbin/fwconsole start -q
ExecStop=/usr/sbin/fwconsole stop -q
[Install]
WantedBy=multi-user.target
EOF

Enable the service to autostart

sudo systemctl daemon-reload
sudo systemctl enable freepbx

Step 6: Access FreePBX Web Interface

Open your web browser and connect to the ip_address_or_hostname/admin of your new FreePBX server.

1. Create the first admin account

install freepbx ubuntu 18.04 set username min

When done providing admin user details, click “Create Account” to create the account. On the next page, you’ll get a login console.

freepbx 15 ubuntu 18.04 debian 9 login

You’ll get to FreePBX dashboard where you can manage your Asterisk PBX.

freepbx 15 ubuntu 18.04 debian 9 admin dashboard

You now have FreePBX 16 running on Debian 11 / Debian 10 system.


https://computingforgeeks.com/how-to-install-freepbx-on-debian-linux/

https://wiki.freepbx.org/display/FDT/How+to+Install+FreePBX+16+on+Debian+11+with+Asterisk+16

How To Install Asterisk 16 PBX on CentOS 7


43669
2

Welcome to our guide on how to Install Asterisk 16 LTS on CentOS 7 Linux. Asterisk is a powerful Open Source PBX system with Enterprise features only available in commercially available PBX systems. Asterisk uses commodity Ethernet hardware and allows for the integration of physically separate installations.

Features of Asterisk PBX system

  • Conference calling
  • Call Recording
  • Call Monitoring
  • Distributed Universal Number Discovery
  • Caller ID on Call Waiting
  • Direct Inward System Access
  • Call Parking
  • SMS Messaging
  • Trunking
  • Transcoding
  • Voicemail
  • Call Queues and many other features.

In our recent guide, we covered the Installation of Asterisk with FreePBX on Ubuntu Ubuntu server. If you need a commercial system there is 3CX which has a guide for the installation on our blog.

Install Asterisk 16 on CentOS 7

Before you start executing Asterisk install commands on your CentOS 7 server, make sure all the package son the system are up to date.

sudo yum -y update

Set hostname type:

sudo hostnamectl set-hostname pbx.example.com

Add EPEL repository

sudo yum  -y install epel-release

Set SELinux  in Permissive Mode by running the commands below:

sudo setenforce 0
sudo sed -i 's/\(^SELINUX=\).*/\SELINUX=permissive/' /etc/selinux/config

Then follow the steps below to install and configure Asterisk 16 on your CentOS 7 / Fedora server.

Step 1: Install Asterisk 16 PBX dependencies

The initial step when setting up Asterisk is to install all required dependencies.

sudo yum -y install wget vim  net-tools

You also need to install Development Tools group packages.

sudo yum -y groupinstall "Development Tools"

The other packages that you need to install are:

sudo yum -y install libedit-devel sqlite-devel psmisc gmime-devel ncurses-devel libtermcap-devel sox newt-devel libxml2-devel libtiff-devel audiofile-devel gtk2-devel uuid-devel libtool libuuid-devel subversion kernel-devel kernel-devel-$(uname -r) git subversion kernel-devel crontabs cronie cronie-anacron wget vim

Step 2: Download and Install Jansson

Jansson is a C library for encoding, decoding and manipulating JSON data. Download and install it on CentOS 7 server by running the commands below:

cd /usr/src/
git clone https://github.com/akheron/jansson.git
cd jansson
autoreconf  -i
./configure --prefix=/usr/
make && make install

Step 3: Download and Install PJSIP

PJSIP is a free and open source multimedia communication library written in C language implementing standard based protocols such as SIP, SDP, RTP, STUN, TURN, and ICE. Clone the project from Github, then compile and install.

cd /usr/src/ 
git clone https://github.com/pjsip/pjproject.git
cd pjproject
./configure CFLAGS="-DNDEBUG -DPJ_HAS_IPV6=1" --prefix=/usr --libdir=/usr/lib64 --enable-shared --disable-video --disable-sound --disable-opencore-amr
make dep
make
make install
ldconfig

Step 4: Download and Install Asterisk

Now that we have all dependency packages installed, we should be ready to download and install Asterisk 16 on CentOS 7.

cd /usr/src/
wget http://downloads.asterisk.org/pub/telephony/asterisk/asterisk-16-current.tar.gz
tar xvfz asterisk-16-current.tar.gz
rm -f asterisk-16-current.tar.gz
cd asterisk-*
./configure --libdir=/usr/lib64

If all goes well, you should get output similar to below:

configure: Menuselect build configuration successfully completed

               .$$$$$$$$$$$$$$$=..      
            .$7$7..          .7$$7:.    
          .$$:.                 ,$7.7   
        .$7.     7$$$$           .$$77  
     ..$$.       $$$$$            .$$$7 
    ..7$   .?.   $$$$$   .?.       7$$$.
   $.$.   .$$$7. $$$$7 .7$$$.      .$$$.
 .777.   .$$$$$$77$$$77$$$$$7.      $$$,
 $$$~      .7$$$$$$$$$$$$$7.       .$$$.
.$$7          .7$$$$$$$7:          ?$$$.
$$$          ?7$$$$$$$$$$I        .$$$7 
$$$       .7$$$$$$$$$$$$$$$$      :$$$. 
$$$       $$$$$$7$$$$$$$$$$$$    .$$$.  
$$$        $$$   7$$$7  .$$$    .$$$.   
$$$$             $$$$7         .$$$.    
7$$$7            7$$$$        7$$$      
 $$$$$                        $$$       
  $$$$7.                       $$  (TM)     
   $$$$$$$.           .7$$$$$$  $$      
     $$$$$$$$$$$$7$$$$$$$$$.$$$$$$      
       $$$$$$$$$$$$$$$$.                

configure: Package configured for: 
configure: OS type  : linux-gnu
configure: Host CPU : x86_64
configure: build-cpu:vendor:os: x86_64 : pc : linux-gnu :
configure: host-cpu:vendor:os: x86_64 : pc : linux-gnu :

Step 5: Set Asterisk menu options

Setup menu options by running the following command:

make menuselect

Use arrow keys to navigate, and Enter key to select.

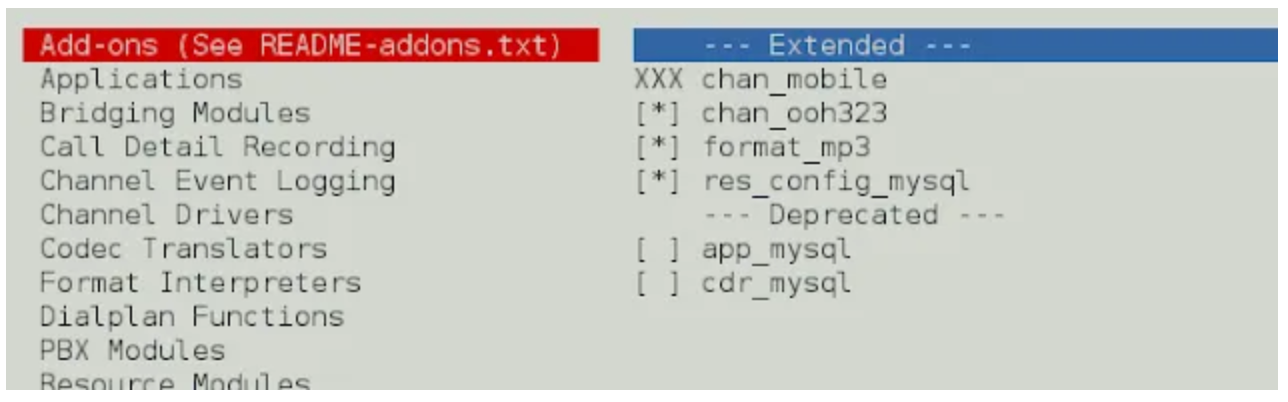
On Add-ons select chan_ooh323 and format_mp3  as shown below

install asterisk ubuntu 18.04 01 min

On Core Sound Packages, select the formats of Audio packets like below

install asterisk ubuntu 18.04 02 min

For Music On Hold, select the following minimal modules

install asterisk ubuntu 18.04 03 min

On Extra Sound Packages select as shown below:

install asterisk ubuntu 18.04 04 min

Enable app_macro under Applications section.

asterisk enable app macro menuselect

You can change other configurations you see fit. When done, save and exit

Now run the following command to download the mp3 decoder library into the source tree.

sudo contrib/scripts/get_mp3_source.sh

To start building and installation of Asterisk with selected modules, run the commands.

make
make install
make samples
make config
ldconfig

Sample output:

---- Asterisk Installation Complete -------+
 +                                           +
 +    YOU MUST READ THE SECURITY DOCUMENT    +
 +                                           +
 + Asterisk has successfully been installed. +
 + If you would like to install the sample   +
 + configuration files (overwriting any      +
 + existing config files), run:              +
 +                                           +
 + For generic reference documentation:      +
 +    make samples                           +
 +                                           +
 + For a sample basic PBX:                   +
 +    make basic-pbx                         +
 +                                           +
 +                                           +
 +-----------------  or ---------------------+
 +                                           +
 + You can go ahead and install the asterisk +
 + program documentation now or later run:   +
 +                                           +
 +               make progdocs               +
 +                                           +
 + **Note** This requires that you have      +
 + doxygen installed on your local system    +
 +-------------------------------------------+

A systemd asterisk unit file will be created for you.

Create a separate user and group to run asterisk services, and assign correct permissions:

groupadd asterisk
useradd -r -d /var/lib/asterisk -g asterisk asterisk
usermod -aG audio,dialout asterisk
chown -R asterisk.asterisk /etc/asterisk
chown -R asterisk.asterisk /var/{lib,log,spool}/asterisk
chown -R asterisk.asterisk /usr/lib64/asterisk

Set Asterisk default user to asterisk:

$ sudo vim /etc/sysconfig/asterisk
AST_USER="asterisk"
AST_GROUP="asterisk"

$ sudo vim /etc/asterisk/asterisk.conf
runuser = asterisk ; The user to run as.
rungroup = asterisk ; The group to run as.

Restart asterisk service after making the changes

sudo systemctl restart asterisk

Enable service to start on boot:

sudo systemctl enable asterisk

Test to see if you can connect to Asterisk CLI:

# asterisk -rvv
Asterisk 16.0.1, Copyright (C) 1999 - 2018, Digium, Inc. and others.
Created by Mark Spencer <markster@digium.com>
Asterisk comes with ABSOLUTELY NO WARRANTY; type 'core show warranty' for details.
This is free software, with components licensed under the GNU General Public
License version 2 and other licenses; you are welcome to redistribute it under
certain conditions. Type 'core show license' for details.
=========================================================================
Running as user 'asterisk'
Running under group 'asterisk'
Connected to Asterisk 16.0.1 currently running on centos-01 (pid = 17182)
centos-01*CLI> 

You can confirm that Asterisk service is running as user asterisk. This is a recommended setting for Production.

Conclusion

You now have a running Asterisk 16 on CentOS 7 server. In our next how-to guide, we will cover the installation and Configuration of FreePBX on CentOS 7. Stay tuned and drop a comment if you encounter any issue with the setup.


https://computingforgeeks.com/how-to-install-freepbx-on-debian-linux/

Como instalar o FreePBX em um VPS da nuvem


Tag: Cloud Servers,  VPS 

FreePBX é um aplicativo gratuito, seguro e seguro que gerencia os serviços de VoIP (Voice Over IP) e atua como telefone para um servidor.FreePBX sofre controle de garantia de qualidade por Sangoma. e oferece flexibilidade e escalabilidade para ajudar a atender às necessidades do consumidor, independentemente de suas necessidades.Muitos serviços de VoIP podem exigir contratos de licença, mas o FreePBX não.

O uso do FreePBX permite personalização por meio de qualquer número de extensões, usuários, IVRs e filas que possam atender às necessidades das tarefas em mãos.Além disso, uma comunidade robusta de código aberto fornece suporte na forma de webinars, fóruns, um wiki de configuração e solução de problemas e vídeos pro-ponta.Solicitar recursos e enviar relatórios de bugs que vejam resultados imediatos.

Requisitos do FreePBX.

Você pode instalar o FreePBX em vários sistemas operacionais.No entanto, as seguintes instruções têm \ instaladas no CENTOS 8. Um servidor VPS ou dedicado com acesso root e uma forma de lâmpada (Linux, Apache, MongoDB, PHP) é necessário.

Preparação do FreePBX.

Antes de instalar o FreePBX, você precisará primeiro preparar o seguinte no seu servidor fazendo login no seu servidor via SSH.

Verifique se o Selinux está desativado

Passo 1: Use o seguinte comando para verifique se o Selinux está desativado.

sestatus

Se o Selinux estiver ativado, execute os seguintes comandos para desativá-lo

sed -i 's/\(^SELINUX=\).*/\SELINUX=disabled/' /etc/sysconfig/selinux
sed -i 's/\(^SELINUX=\).*/\SELINUX=disabled/' /etc/selinux/config

Em seguida, reinicie e verifique o status do SELinux executando 'Sestatus'.Deve dizer:

SELinux status: disabled

Passo 2: Antes de iniciar a instalação adicional, verifique se o sistema operacional está atualizado executando o seguinte comando

sudo dnf -y update

Instalar Dependências

Passo 1: Instalar ferramentas de desenvolvimento.

dnf -y group install "Development Tools."

Passo 2: Crie um novo usuário chamado "Asterisk"

adduser asterisk -m -c "Asterisk User"

Etapa 3: Instalar dependências necessárias adicionais

Ativar PowerTools.

dnf config-manager --set-enabled powertools

Instale dependências

dnf -y install lynx tftp-server unixODBC mariadb-server mariadb httpd ncurses-devel sendmail sendmail-cf newt-devel libxml2-devel libtiff-devel gtk2-devel subversion git wget vim uuid-devel sqlite-devel net-tools gnutls-devel texinfo libuuid-devel libedit-devel

Desativar PowerTools.

dnf config-manager --set-disabled powertools

Passo 4: Instale o conector ODBC do MySQL 8.0.2

dnf install -y https://downloads.mysql.com/archives/get/p/10/file/mysql-connector-odbc-8.0.21-1.el8.x86_64.rpm

dnf install -y epel-release

dnf install -y libid3tag

dnf install -y https://forensics.cert.org/cert-forensics-tools-release-el8.rpm

dnf --enablerepo=forensics install -y sox

dnf install -y audiofile-devel

dnf install -y python3-devel

Etapa 5: Instale o PHP7.2

dnf remove php*
dnf install -y php php-pdo php-mysqlnd php-mbstring php-pear php-process php-xml php-opcache php-ldap php-intl php-soap php-json

Etapa 6: Instale a versão do Nodejs 12

dnf module enable nodejs:12 -y
dnf install -y nodejs

Instalar e configurar MariaDB

Passo 1: Ativar e iniciar MariaDB

systemctl enable mariadb.service
systemctl start mariadb

Passo 2: Prenda a instalação da MariaDb.

O prompt solicitará sua senha atualizada.Como você acabou de instalar o MySQL, você não terá uma configuração, então deixe em branco pressionando Enter.Em seguida, o prompt perguntará se você deseja definir uma senha de root.Não defina uma senha de root.Nós protegemos o banco de dados automaticamente como parte do script de instalação.Você pode escolher Sim para o restante para remover alguns usuários de amostra e bancos de dados, desativar logins raiz remotos e carregar essas novas regras.

mysql_secure_installation

Ativar e iniciar o servidor da Web Apache

Etapa 1: Execute os seguintes comandos para ativar e iniciar o WebServer Apache

systemctl enable httpd.service
systemctl start httpd.service

Passo 2: Verifique o status do serviço Apache

systemctl status httpd.service

Instalar requisitos legados de pêra

Execute o seguinte comando para instalar o legado pêra

pear install Console_Getopt

Baixe e instale asterisco

Passo 1: Baixar arquivos de origem do asterisco

cd /usr/src
wget http://downloads.asterisk.org/pub/telephony/asterisk/asterisk-16-current.tar.gz

Passo 2: Extrair o seu download Drupal.

tar xvfz asterisk-16-current.tar.gz

Etapa 3: Remova o arquivo tar

rm -f asterisk-*-current.tar.gz

Compile e instale asterisco

Passo 1: Vamos para

cd asterisk-*
contrib/scripts/install_prereq install
./configure --libdir=/usr/lib64 --with-jansson-bundled
contrib/scripts/get_mp3_source.sh
make menuselect

Passo 2: Você será solicitado a ponto de escolher quais módulos para construir.Você já permitirá a maioria deles, mas se quiser suporte MP3 (por exemplo, para a música em espera), você precisa ativar manualmente 'Format_MP3' na primeira página.Selecione "Salvar e Sair".

etapa 3: Faça o pacote do asterisco

make
make install
make config
make samples
ldconfig
chkconfig asterisk off

Passo 4: Definir permissões de propriedade do asterisco

chown asterisk. /var/run/asterisk
chown -R asterisk. /etc/asterisk
chown -R asterisk. /var/{lib,log,spool}/asterisk
chown -R asterisk. /usr/lib64/asterisk
chown -R asterisk. /var/www

Atualize as configurações do Apache

Passo 1: Atualize os seguintes parâmetros.

sed -i 's/\(^upload_max_filesize = \).*/\120M/' /etc/php.ini
sed -i 's/\(^memory_limit = \).*/\1256M/' /etc/php.ini
sed -i 's/^\(User\|Group\).*/\1 asterisk/' /etc/httpd/conf/httpd.conf
sed -i 's/AllowOverride None/AllowOverride All/' /etc/httpd/conf/httpd.conf
sed -i 's/\(^user = \).*/\1asterisk/' /etc/php-fpm.d/www.conf
sed -i 's/\(^group = \).*/\1asterisk/' /etc/php-fpm.d/www.conf
sed -i 's/\(^listen.acl_users = apache,nginx\).*/\1,asterisk/' /etc/php-fpm.d/www.conf

Passo 2: Reinicie o Apache e Php-FPM

systemctl restart httpd.service
systemctl restart php-fpm

Baixe e instale FreePBX.

Passo 1: Baixe e instale os arquivos de origem FreePBX.

cd /usr/src
wget http://mirror.freepbx.org/modules/packages/freepbx/freepbx-15.0-latest.tgz
tar xfz freepbx-15.0-latest.tgz
rm -f freepbx-15.0-latest.tgz
cd freepbx
./start_asterisk start
./install -n

Passo 2: Crie um script de inicialização do FreePBX

vi /etc/systemd/system/freepbx.service

Adicione o seguinte ao arquivo.

[Unit]
Description=FreePBX VoIP Server
After=mariadb.service

[Service]
Type=oneshot
RemainAfterExit=yes
ExecStart=/usr/sbin/fwconsole start -q
ExecStop=/usr/sbin/fwconsole stop -q

[Install]
WantedBy=multi-user.target

etapa 3: Execute o script

systemctl enable freepbx.service

Passo 4: Inicie o serviço PBX

systemctl start freepbx

Etapa 5: Verifique o status do serviço PBX

systemctl status -l freepbx.service

Configuração completa usando FreePBX GUI (interface gráfica do usuário)

Passo 1: No seu browser, vá para o endereço IP do seu servidor (http: \\ 192.x.x.1)

Passo 2: Crie um nome de usuário e senha do administrador.

Etapa 3: Digite um endereço de e-mail que você gostaria de enviar suas notificações.

Passo 4: Nomeie seu servidor FreePBX.

Etapa 5: Certifique-se de deixar atualizações de módulos, atualizações de segurança e e-mails de segurança ativados e clicar em Sistema de Configuração.


https://www.hostwinds.pt/tutorials/how-to-install-freepbx-on-cloud-vps